In the bustling digital bazaar that is Facebook Marketplace, finding treasures can be as thrilling as it is overwhelming. With a plethora of items ranging from vintage apparel to the latest electronics, it’s easy to get lost in the sea of possibilities. However, the platform’s “Saved Items” feature acts as a beacon, guiding users back to their interests. This article delves deep into how to find saved items on Facebook Marketplace, ensuring that no desired item ever slips through the cracks.
The Essence of Saving
Before diving into the retrieval process, it’s crucial to understand the “Saved Items” feature’s core. This tool is more than a mere bookmark; it’s a strategic way to monitor items of interest. Whether you’re waiting for a price drop or comparing options, saving an item keeps it within easy reach. This feature not only aids in decision-making but also alerts users to any changes in their saved items, such as price adjustments.
Navigating to Your Saved Treasures
The journey to uncover your saved items varies slightly between devices, but the essence remains the same. Here’s how you can navigate the digital marketplace to find your saved gems on both mobile and desktop platforms.
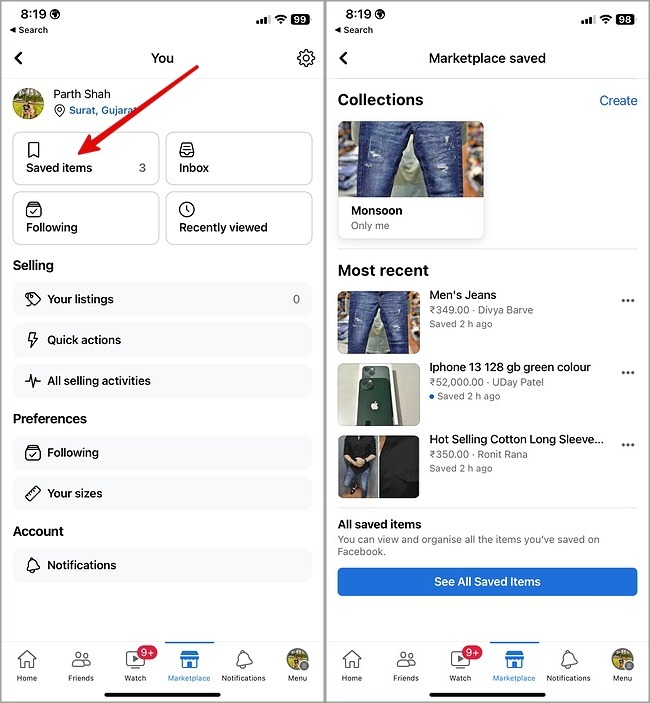
On Mobile Devices
- Update Your App: Ensure your Facebook app is up-to-date to avoid any navigational hiccups.
- Access Marketplace: Tap the menu tab and select “Marketplace.”
- Profile Icon: On the Marketplace page, tap the profile icon at the top-right corner.
- Saved Items: Tap on “Saved items” to reveal your treasure trove of saved listings.
On Desktop
- Marketplace Access: Visit facebook.com and click on “Marketplace” from the sidebar on the left.
- Buying Section: Click on “Buying” on the left side, then open the “Saved” option to view your saved listings in the order you saved them.
For those seeking a direct route, facebook.com/marketplace/you/saved offers a shortcut to your saved items’ page.
The Art of Deletion
While saving items is a breeze, removing them from your saved list is equally straightforward. Whether you’ve made a purchase or changed your mind, keeping your saved items organized is key. Here’s a quick guide to removing items from your saved list:
- Navigate to Saved: In the Facebook app, tap the Menu tab and go to “Saved.”
- Select and Delete: Find the item you wish to remove, tap the ellipsis button next to it, and select “Unsave.” Confirm by tapping “Remove.”
Final Reflections: A Treasure Trove Unveiled
In the end, the ability to find saved items on Facebook Marketplace is akin to having a map to hidden treasures. Whether you’re a seasoned bargain hunter or a casual browser, this feature ensures that the items that catch your eye remain within reach until you’re ready to make a move. As we’ve explored the paths to uncover these saved items, it’s clear that Facebook Marketplace is more than a platform for transactions; it’s a community where interests are bookmarked, revisited, and cherished.
Frequently Asked Questions
- Can I save items on Facebook Marketplace without others knowing?
Yes, your saved items are private, and sellers are not notified when someone saves their listing. - Is there a limit to how many items I can save on Facebook Marketplace?
Facebook does not specify a limit, allowing users to save numerous items for future reference. - How do I know if a saved item’s price has changed?
Facebook sends notifications to alert users of any price changes to their saved items, ensuring you never miss out on a deal. - Can I organize my saved items into collections?
Yes, Facebook allows users to create collections of saved items, making it easier to categorize and revisit them. - What happens if a saved item is sold to someone else?
If an item is sold, it will still appear in your saved items but will be marked as sold, indicating it’s no longer available for purchase.
Remember, knowing how to find saved items on Facebook Marketplace enriches your shopping experience, ensuring that no item of interest ever gets lost in the digital shuffle.